Creating an old-fashioned apple crisp recipe is more than a culinary task; it’s a heartfelt tradition. This dessert brings together sweet, spiced apples and a perfectly crisp topping that delights every palate. Whether you’re hosting a holiday gathering or craving a cozy treat, this step-by-step guide will make your baking effortless and rewarding.
Table of Contents
Why This Recipe Stands Out
The appeal of an old-fashioned apple crisp recipe lies in its simplicity and versatility. Made with everyday ingredients and no special equipment, it’s a dessert anyone can master. Additionally, the combination of warm flavors and crunchy textures makes it a perennial favorite. From family dinners to potlucks, this recipe always impresses.
Ingredients You’ll Need for Success
A great apple crisp begins with high-quality ingredients. Below is a breakdown of what you’ll need:
For the Apple Filling:
- 6 medium apples (Granny Smith or Honeycrisp for tartness; Golden Delicious for sweetness)
- 2 tablespoons granulated sugar
- ¾ teaspoon ground cinnamon
- 1½ teaspoons fresh lemon juice
For the Crisp Topping:
- 1 cup light brown sugar
- ¾ cup old-fashioned oats (not quick oats)
- ¾ cup all-purpose flour
- 1 teaspoon ground cinnamon
- A pinch of kosher salt
- ½ cup cold unsalted butter, diced into cubes
These ingredients form the foundation of your old-fashioned apple crisp recipe. For detailed variations, visit this guide to the best apple desserts.
Step-by-Step Preparation: Mastering the Old-Fashioned Apple Crisp Recipe
Creating a flawless old-fashioned apple crisp recipe requires careful attention to detail. By following these step-by-step instructions, you’ll ensure every layer is perfectly prepared for a dessert that’s both delicious and visually appealing.
1. Preheat and Prepare Your Workspace
Before diving into the recipe, set the stage for success:
- Preheat the Oven: Adjust your oven to 350°F (175°C). Preheating ensures consistent heat, allowing the crisp to bake evenly.
- Prepare the Baking Dish: Use an 8×8-inch baking dish. Grease it generously with butter or a non-stick spray to prevent sticking. A glass or ceramic dish works best, as it distributes heat evenly and showcases the bubbling layers during baking.
Pro Tip: Using parchment paper can simplify cleanup and ensure easy removal of servings.
2. Prepare the Apple Mixture

The apple filling is the heart of this dessert. Here’s how to get it just right:
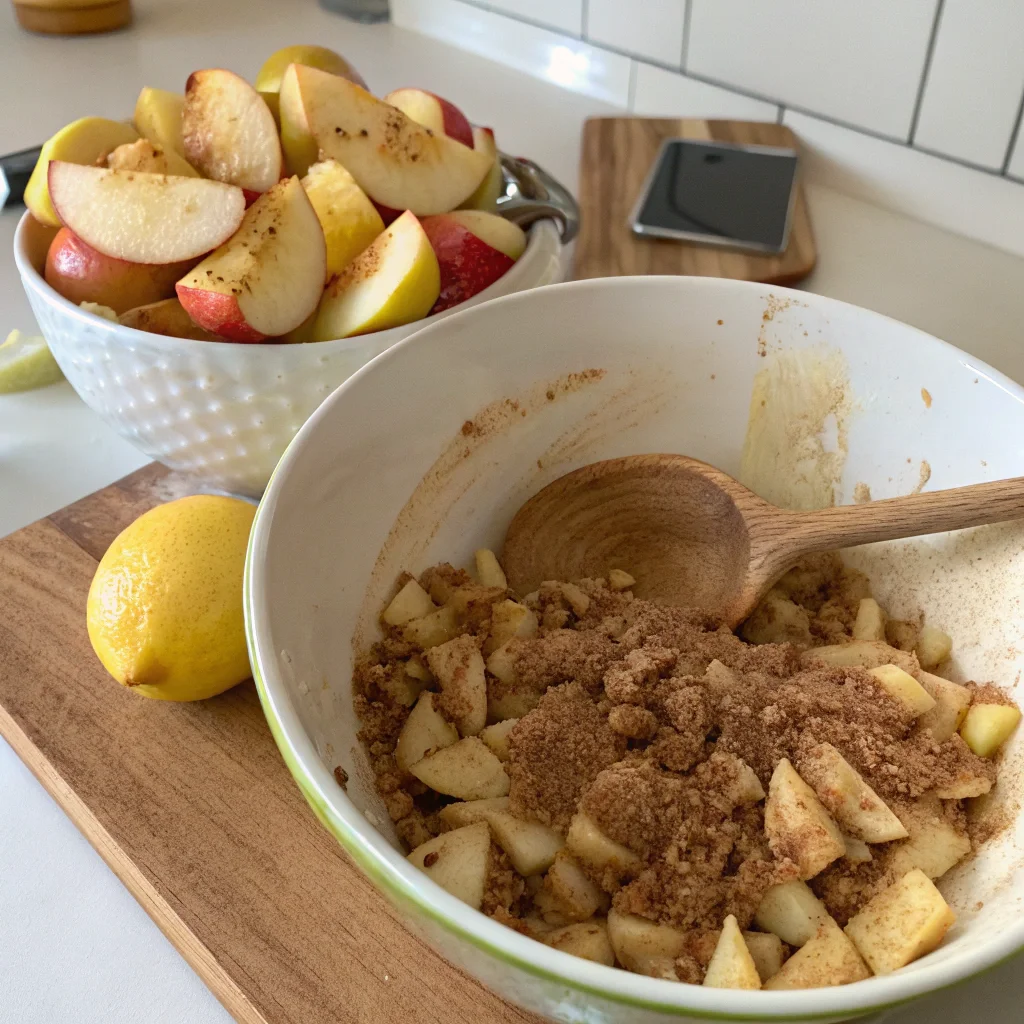
Peel and Slice
- Peel the apples for a smooth, tender filling. While leaving the peels on can add a rustic touch and extra fiber, peeled apples create a more classic texture.
- Slice the apples evenly to ensure uniform cooking. Aim for slices about ¼-inch thick; this size is perfect for achieving softness without turning mushy.
Mix the Ingredients
- Place the sliced apples in a large mixing bowl.
- Add 2 tablespoons of granulated sugar, ¾ teaspoon of ground cinnamon, and 1½ teaspoons of fresh lemon juice.
- Stir the mixture thoroughly, ensuring every slice is coated. The sugar sweetens the apples while the cinnamon adds warmth, and the lemon juice prevents browning while enhancing the flavors.
Real-Life Tip: If you prefer a slightly spiced apple filling, sprinkle in a pinch of nutmeg or cloves.
3. Create the Crisp Topping
The crisp topping is the crowning glory of this recipe. It must be perfectly crumbly yet cohesive enough to form a satisfying crust.
Combine Dry Ingredients
- In a medium bowl, mix:
- 1 cup light brown sugar
- ¾ cup old-fashioned oats
- ¾ cup all-purpose flour
- 1 teaspoon ground cinnamon
- A pinch of kosher salt
The combination of oats and flour provides the ideal texture—crispy and light with a hint of chewiness.
Incorporate the Butter
- Dice ½ cup cold unsalted butter into small cubes. Cold butter is essential for achieving the signature crumbly topping.
- Using a pastry cutter, fork, or your fingers, cut the butter into the dry mixture. The goal is to create pea-sized crumbs. This step ensures the butter evenly distributes through the topping, leading to golden-brown perfection.
Quick Tip: If your kitchen is warm and the butter softens too quickly, chill the topping mixture for 10–15 minutes before using.
4. Assemble the Apple Crisp
With your apple mixture and topping ready, it’s time to assemble:
- Spread the apple mixture evenly across the bottom of the greased baking dish. Ensure the layer is flat to allow uniform baking.
- Sprinkle the topping over the apples, covering them completely. Use your hands to gently pat the topping down, creating a smooth, even surface. This step helps the topping brown evenly and prevents gaps.
5. Bake to Perfection
Baking is where the magic happens. Follow these tips to get it just right:
- Bake: Place the dish in the preheated oven and bake for 40–50 minutes. The topping should be golden brown, and the apple mixture should bubble around the edges.
- Check for Doneness: After 40 minutes, test the crisp. Insert a fork into the apple layer; the apples should be tender but not mushy.
- Adjust for Your Oven: Every oven bakes differently. If the topping browns too quickly, loosely cover the dish with aluminum foil and continue baking.
6. Serve and Savor
Let the crisp cool for about 10 minutes before serving. This allows the juices to settle, ensuring clean, luscious servings.
Serving Suggestions:
- Classic: Serve warm with a scoop of vanilla bean ice cream.
- Decadent: Drizzle with caramel sauce for added sweetness.
- Wholesome: Pair with a dollop of whipped cream or a sprinkling of chopped nuts.
Pro Tip: For leftovers, reheat individual portions in the oven at 300°F (150°C) to revive the crisp topping.
By carefully following these steps, your old-fashioned apple crisp recipe will turn out perfectly every time, delighting everyone who takes a bite!
“Pair this crisp with a dollop of whipped cream or a side of homemade jam, like this ultimate strawberry jam recipe.”
Pro Tips for a Flawless Apple Crisp
Choosing the Right Apples
The choice of apples directly affects the flavor and texture. A mix of sweet and tart varieties often yields the best results. For instance:
- Granny Smith: Maintains firmness during baking.
- Honeycrisp: Adds a touch of natural sweetness.
- Golden Delicious: Perfectly tender when baked.
Adjusting for Sweetness
If your apples are particularly sweet, reduce the sugar in the topping slightly. This simple adjustment ensures a balanced flavor profile.
“For a variation without oats, check out this easy apple crisp recipe without oats.“
Variations to Try
Adding a Nutty Twist
Incorporate chopped pecans or walnuts into the topping for added crunch. Not only does this enhance texture, but it also provides a nutty undertone that complements the apples.
Gluten-Free Options
Substitute the all-purpose flour with a gluten-free alternative. Ensure the oats used are certified gluten-free for an inclusive dessert option.
For more creative spins on this recipe, visit this resource on baking inspiration.
Nutritional Information (Per Serving)
Understanding the nutritional content of an old-fashioned apple crisp recipe helps you make informed dietary choices while enjoying this timeless dessert. Below is a detailed breakdown of the nutrients in a standard serving size (based on six servings from an 8×8 dish). Adjustments may vary depending on ingredient brands or substitutions.
| Nutrient | Amount Per Serving | Daily Value (%)* |
|---|---|---|
| Calories | 315 kcal | 16% |
| Total Fat | 12 g | 18% |
| Saturated Fat | 7 g | 35% |
| Trans Fat | 0 g | 0% |
| Cholesterol | 30 mg | 10% |
| Sodium | 80 mg | 3% |
| Total Carbohydrates | 49 g | 16% |
| Dietary Fiber | 4 g | 16% |
| Total Sugars | 32 g | N/A |
| Added Sugars | 15 g | 30% |
| Protein | 3 g | 6% |
| Vitamin A | 350 IU | 7% |
| Vitamin C | 6 mg | 10% |
| Calcium | 40 mg | 4% |
| Iron | 1 mg | 6% |
| Potassium | 200 mg | 6% |
Key Insights on Nutritional Content
- Calories: At 315 calories per serving, this dessert is moderate in energy, making it a suitable indulgence when paired with balanced meals.
- Fats:
- Most of the fat comes from butter, contributing to the rich flavor and crispy topping.
- Saturated fat, while higher, adds to the dessert’s texture. Moderation is key.
- Carbohydrates:
- The natural sugars from the apples and the added sugars in the topping provide the sweetness.
- Dietary fiber from the apples and oats supports digestion.
- Proteins: While not high in protein, the oats and butter contribute a small amount.
- Micronutrients:
- Vitamin C comes from the apples and lemon juice, supporting immune health.
- Potassium aids in maintaining proper muscle and nerve function.
Adjusting for Dietary Preferences
If you’re aiming to tailor the recipe to fit specific nutritional needs:
- Lower Sugar: Reduce the added sugar by half and rely more on the natural sweetness of the apples.
- Boost Protein: Add a handful of chopped nuts like pecans or almonds to the topping.
- Reduce Fat: Swap half the butter for coconut oil or unsweetened applesauce to cut saturated fat while maintaining moisture.
Frequently Asked Questions About Apple Crisp
What is the difference between apple crumble and apple crisp?
The primary difference between an apple crumble and an apple crisp lies in the topping. Apple crisp typically includes oats in its topping, which creates a crispy texture when baked. In contrast, apple crumble features a more traditional streusel-like topping made from flour, sugar, and butter, resulting in a softer, denser layer.
What are the best apples for apple crisp?
For a perfect apple crisp recipe, choose apples that balance sweetness and tartness while maintaining their texture during baking. The best options include:
- Granny Smith: Tart and firm, providing structure and a sharp contrast to the sweet topping.
- Honeycrisp: Sweet, crisp, and juicy, these apples add natural sweetness.
- Golden Delicious: Mellow and tender, they blend well with other varieties.
Using a mix of apples can elevate the flavor complexity of your dessert.
What is the difference between apple betty and apple crisp?
An apple betty is an old-fashioned dessert where spiced apples are layered with breadcrumbs or cubes, then baked to a golden finish. Unlike an apple crisp, the topping in an apple betty does not contain oats or resemble a crumble. Instead, it’s more bread-like, giving the dessert a distinct texture and flavor.
How do you keep apples from getting mushy in apple crisp?
To prevent apples from becoming mushy:
- Choose Firm Apples: Varieties like Granny Smith and Honeycrisp hold their shape during baking.
- Cut Even Slices: Uniform slices ensure even cooking and prevent over-softening.
- Avoid Overbaking: Check the crisp after 40 minutes and remove it from the oven once the apples are tender but not falling apart.
Why do you put lemon juice over the apples when making an apple crisp?
Lemon juice serves two purposes in an apple crisp recipe:
- Preserves Color: It prevents apples from browning as you prepare the filling.
- Enhances Flavor: The acidity balances the sweetness of the sugar and topping, creating a well-rounded flavor profile.
Why did my apple crisp turn to mush?
Several factors can cause an apple crisp to become mushy:
- Overbaking: Cooking it for too long can break down the apples and the topping.
- Wrong Apple Variety: Soft apples like Red Delicious may lose their structure during baking.
- Excess Liquid: Too much sugar or juicy apples can create extra moisture, leading to a soggy dish. To counteract this, add a tablespoon of flour to the apple mixture to absorb the juices.
By following these tips and selecting the right ingredients, you’ll achieve the ideal texture in your apple crisp every time.
Conclusion: Final Thoughts About old fashioned apple crisp recipe
This old-fashioned apple crisp recipe embodies everything we love about homemade desserts: simplicity, flavor, and the ability to bring people together. Whether you’re a seasoned baker or a kitchen novice, this recipe will exceed expectations. Pair it with vanilla ice cream or enjoy it on its own for an unforgettable treat.
Make sure to bookmark this page and explore the other internal links for even more delightful recipes and tips. Share your experience in the comments below and let us know how this dish brightened your table!


